

MCP Server
MCP Server
The OctoPerf MCP server lets any Model Context Protocol \- aware AI agent drive your OctoPerf account - import Virtual Users, edit them, validate, run load scenarios, and read back metrics - all from a chat or IDE, without leaving the agent.
It is exposed at <https://api.octoperf.com/mcp>.
What it does
The MCP server is a thin, stateless bridge between an LLM agent and the OctoPerf REST API. Every tool call is authenticated as you: there are no service identities and no API keys - and resolves to a regular OctoPerf API call. Anything you can do from the web UI as your user, the agent can do on your behalf when you authorize it.
Concretely, the server exposes around 100 tools grouped into the following areas:
- Discovery: list workspaces, projects, scenarios, Virtual Users, Docker providers
- Virtual User import: bring in recordings from HAR, JMX, Postman, Playwright, WebDriver, URL lists, or previously exported archives
- Virtual User edit: rename, re-tag, patch the action tree via JSON Patch, manage variables, HTTP servers, correlation rules and project files
- Validation: kick off a functional check, read back the per-action validation index, drill into failing requests / responses, fetch HTTP bodies
- Bench run: start a scenario, monitor progress, stop a running run, read Docker launch logs
- Analysis: list and read bench reports, fetch the value series behind any chart / table / summary / top widget, expand error rows, run trend reports
- Self-hosted setup: deploy the MCP server alongside an OctoPerf Enterprise instance, configure the bundled OAuth IdP.
- Connected Apps: review and revoke the agents you authorized.
- OAuth Clients (admin): audit and clean up registered OAuth clients on a self-hosted instance.
Each tool returns a deep-link to the matching page in the OctoPerf UI so the agent can hand you a clickable URL when it summarizes a result.
Public HTTP downloads
The MCP server also serves a small set of public, unauthenticated markdown files under `/mcp/public/**`, so any agent host can bootstrap an OctoPerf project before it has IdP credentials:
| URL | Body | | ----------------------------------------------------------------------- | ---------------------------------------------------------------------------------------- | | <https://api.octoperf.com/mcp/public/AGENTS.md> | Cross-vendor agent guide - drop at the root of a project | | <https://api.octoperf.com/mcp/public/skills/auto-correlation.md> | Skill: fix replay failures caused by dynamic values (CSRF, sessions) | | <https://api.octoperf.com/mcp/public/skills/validation-triage.md> | Skill: triage a Virtual User with many validation failures | | <https://api.octoperf.com/mcp/public/skills/scenario-diagnosis.md> | Skill: investigate a poor or failing scenario run | | <https://api.octoperf.com/mcp/public/skills/real-browser-probe.md> | Skill: convert a JMeter VU to Playwright and compose a hybrid load + UX-probe scenario | | <https://api.octoperf.com/mcp/public/skills/scheduling.md> | Skill: schedule scenarios (one-shot / cron) with the right UTC + Unix cron semantics | | <https://api.octoperf.com/mcp/public/skills/bench-reports.md> | Skill: pick the right tool per bench-report widget, decode metric semantics, read trends | | <https://api.octoperf.com/mcp/public/skills/export-bench-report-pdf.md> | Skill: export a bench report as PDF (submit print task, poll, download) | | <https://api.octoperf.com/mcp/public/skills/async-polling.md> | Skill: polling cadence and terminal conditions for async tasks (validations, runs, ...) |
These files are also available in OctoPerf Claude Plugins repository
JSON schemas
The entity schemas used to build `patch_*` payloads (JSON Schema 2020-12, one `oneOf` branch per polymorphic subtype) are served the same way, as plain JSON under `/mcp/public/schema/`. These are the HTTP fallback for clients that call tools but don't read MCP resources — the body is identical to the matching `octoperf://schema/*` resource:
| URL | Schema | | ------------------------------------------------------------------- | ------------------------ | | <https://api.octoperf.com/mcp/public/schema/vu.json> | Virtual User action tree | | <https://api.octoperf.com/mcp/public/schema/scenario.json> | Scenario + user profiles | | <https://api.octoperf.com/mcp/public/schema/bench-report.json> | Bench report widgets | | <https://api.octoperf.com/mcp/public/schema/variables.json> | Variable subtypes | | <https://api.octoperf.com/mcp/public/schema/correlation-rules.json> | Correlation rules | | <https://api.octoperf.com/mcp/public/schema/injection-rules.json> | Injection rule subtypes |
Connect a client
This section walks through connecting popular Model Context Protocol clients to the OctoPerf MCP server.
Any MCP client
The server speaks Streamable HTTP at <https://api.octoperf.com/mcp> and authenticates with OAuth 2.1 (Dynamic Client Registration - no API key, no manual client setup). Any MCP-aware client can connect with just that URL: paste it wherever the client expects a remote / HTTP MCP server, pick the HTTP transport, and complete the browser login on first use.
The sections below cover the most common clients. Anything not listed here - Windsurf, Cline, Continue.dev, Zed, Goose, JetBrains AI Assistant, LibreChat, ... - follows the same pattern: add the URL, choose the HTTP transport, authorize in the browser. Where a client supports a project context file, point it at the agent guide.
Claude.ai (Custom Connector)
See Anthropic's Get started with custom connectors using remote MCP for the canonical Claude.ai flow.
#### Adding the connector
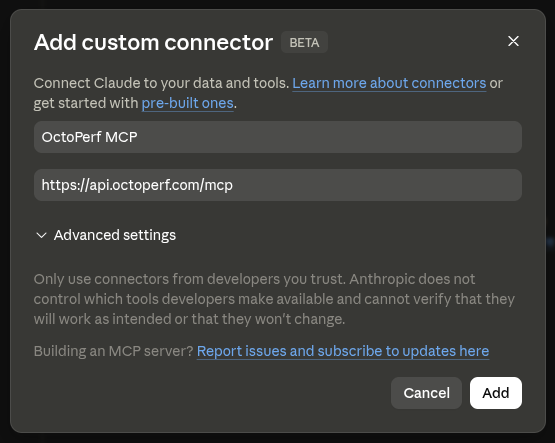
1. Open Customize → Connectors in claude.ai (Pro/Max). On Team/Enterprise plans, an Owner does the same from Organization settings → Connectors. 2. Click the + button, then Add custom connector. 3. Paste `https://api.octoperf.com/mcp` as the connector URL and click Add. 4. Claude opens a browser tab to OctoPerf. Log in with your usual credentials. 5. The connector appears in the list as OctoPerf MCP and is available in every new conversation.

#### Configuring the allowlist
Claude.ai web: file upload / download requires a domain allowlist (org admin).
Several OctoPerf tools (`upload_project_file`, `download_project_file`, `download_bench_result_file`, the PDF leg of `export_bench_report_pdf`, plus any Playwright trace / HAR / JTL pull) return a short-lived presigned URL pointing at the OctoPerf REST API.
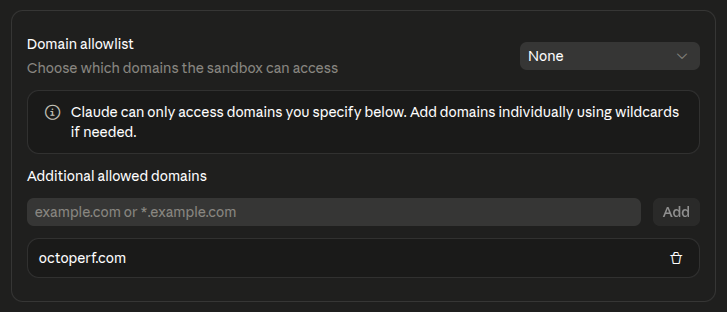
Claude's sandbox fetches that URL to ingest the bytes, and egress is gated by an org-level admin setting: Claude.ai → Organization Settings (Admin only) → Capabilities → Domain allowlist → Additional allowed domains. Add `octoperf.com` (or `*.octoperf.com` to also cover an on-prem deployment) once for the whole org; the dropdown can stay on None (no preset list needed), the manual entry alone is enough.

Only a workspace admin can edit this list - non-admin members of the org inherit it. If your org doesn't have an admin slot to flip this (or you're on a personal Claude.ai account where the setting lives under your own account), the file tools will keep failing on Claude.ai web and Desktop.
#### Chatting with Claude
In a chat, ask Claude something like "list my OctoPerf workspaces" and it will call the matching MCP tool and render the result.
You should also tell Claude to read the content of the agent guide. It acts as a knowledge base that informs the AI about your project context, ensuring that follows OctoPerf project's standards.
Info
If your usage is file-heavy (frequent CSV uploads, downloading bench result files, exporting PDFs, pulling Playwright traces) and the allowlist is out of reach, Claude Code is the better client: it runs the fetches itself via local shell commands, so no sandbox allowlist applies and uploads / downloads work out of the box. Cursor, Continue.dev and the MCP Inspector are also unaffected.
Claude Code
The recommended setup uses the official OctoPerf plugin distributed through the OctoPerf/octoperf-claude-plugins marketplace. It registers the MCP server, installs the agent guide, and adds eight workflow shortcuts (auto-correlation, validation triage, scenario diagnosis, bench-report reading, PDF export, real-browser probe, scheduling, async polling) in one step.
From any Claude Code prompt:
`/plugin marketplace add OctoPerf/octoperf-claude-plugins /plugin install octoperf@octoperf `
The first tool call opens a browser tab to OctoPerf. Log in with your usual credentials - the login authorizes Claude Code as a connected agent. After that, every future tool call reuses the cached token transparently.
Once installed, ask Claude Code something like "list my OctoPerf workspaces", "why is my last scenario run failing?", or "auto-correlate this Virtual User" and the matching workflow runs automatically.
#### Manual setup (without the plugin)
If you prefer registering only the MCP server (no workflow shortcuts, no agent guide), see Anthropic's Connect Claude Code to tools via MCP for the full reference, then run:
`claude mcp add --transport http octoperf https://api.octoperf.com/mcp `
All flags (`--transport`, `--scope`, ...) must come before the server name. To remove the server later:
`claude mcp remove octoperf `
Open a Claude session and type `/mcp` to connect to the newly added OctoPerf MCP Server.
You can download the agent guide manually.
You can also install the workflow shortcuts by hand by downloading them from `https://api.octoperf.com/mcp/public/skills/<name>.md` into `.claude/skills/octoperf-<name>/SKILL.md` (or `~/.claude/skills/...` to enable them globally). The plugin above does the same thing for you.
Claude Desktop
See Anthropic's Connect Claude Desktop to tools via MCP for the canonical Claude Desktop flow. Open `claude_desktop_config.json` (via Settings → Developer → Edit Config) and add an entry under `mcpServers`:
`{ "mcpServers": { "octoperf": { "url": "https://api.octoperf.com/mcp" } } } `
Restart Claude Desktop. The first tool call opens a browser tab for OAuth login; the bearer token is cached afterwards.
Codex
See OpenAI's Model Context Protocol guide for the full Codex reference, then register the server:
`codex mcp add octoperf --url https://api.octoperf.com/mcp `
Then authenticate:
`codex mcp login octoperf `
Codex opens a browser tab to OctoPerf. Log in with your usual credentials - the login authorizes Codex as a connected agent. The token is cached afterwards, so every future tool call reuses it transparently. To remove the server later:
`codex mcp remove octoperf `
Codex reads an `AGENTS.md` file at the root of your project natively, so download the agent guide there:
`curl -o AGENTS.md https://api.octoperf.com/mcp/public/AGENTS.md `
In a session, ask Codex something like "list my OctoPerf workspaces" and it will call the matching MCP tool and render the result.
ChatGPT
ChatGPT can reach the OctoPerf MCP server as a custom connector (remote MCP). Availability and the exact location of the setting depend on your plan and OpenAI's rollout (custom MCP connectors / Developer mode are still evolving), so follow OpenAI's current Connectors in ChatGPT documentation for the canonical flow.
1. In ChatGPT, open Settings → Connectors (you may need to enable Developer mode to add a custom MCP server). 2. Add a connector with the URL `https://api.octoperf.com/mcp`. 3. Authorize in the browser when prompted; the token is cached afterwards.
Info
Like Claude.ai, ChatGPT runs tools in a sandbox. File tools that return a presigned `*.octoperf.com` URL (`upload_project_file`, `download_project_file`, `download_bench_result_file`, the PDF leg of `export_bench_report_pdf`, Playwright trace / HAR / JTL pulls) may be blocked by the host's egress policy. For file-heavy use, prefer Codex or another local client, which run the fetches themselves.
Gemini CLI
See Google's MCP servers with the Gemini CLI for the full reference, then register the server:
`gemini mcp add --transport http octoperf https://api.octoperf.com/mcp `
Open a Gemini session and authenticate:
`/mcp auth octoperf `
Gemini opens a browser tab to OctoPerf. Log in with your usual credentials - the login authorizes Gemini as a connected agent and the token is cached afterwards. To remove the server later:
`gemini mcp remove octoperf `
Gemini CLI reads a `GEMINI.md` context file at the root of your project, so download the agent guide there:
`curl -o GEMINI.md https://api.octoperf.com/mcp/public/AGENTS.md `
In a session, ask Gemini something like "list my OctoPerf workspaces" and it will call the matching MCP tool and render the result.
GitHub Copilot (VS Code)
MCP servers are available to Copilot in agent mode (VS Code 1.101 or later). See Add and manage MCP servers in VS Code for the full reference.
Create (or edit) `.vscode/mcp.json` in your workspace and add the server (alternatively, run MCP: Add Server from the Command Palette and pick HTTP):
`{ "servers": { "octoperf": { "type": "http", "url": "https://api.octoperf.com/mcp" } } } `
When the server starts, VS Code discovers the OAuth configuration automatically and opens a browser tab to OctoPerf. Log in with your usual credentials - the login authorizes Copilot as a connected agent and the token is cached afterwards.
Copilot reads custom instructions from `.github/copilot-instructions.md`, so download the agent guide there:
`curl -o .github/copilot-instructions.md https://api.octoperf.com/mcp/public/AGENTS.md `
Open Copilot Chat in agent mode and ask something like "list my OctoPerf workspaces" \- Copilot calls the matching MCP tool and renders the result.
Cursor
See Cursor's Model Context Protocol documentation for the full reference. The quickest path is the one-click deep link:
➕ Add to Cursor
To add it by hand, create (or edit) `.cursor/mcp.json` in your project - or `~/.cursor/mcp.json` to enable it for every project:
`{ "mcpServers": { "octoperf": { "url": "https://api.octoperf.com/mcp" } } } `
Cursor opens a browser tab to OctoPerf on the first tool call. Log in with your usual credentials - the login authorizes Cursor as a connected agent and the token is cached afterwards.
Cursor has no fixed context filename, so save the agent guide as a project rule under `.cursor/rules/` (or attach it to the chat as context):
`curl -o .cursor/rules/octoperf.md https://api.octoperf.com/mcp/public/AGENTS.md `
In a chat, ask Cursor something like "list my OctoPerf workspaces" and it will call the matching MCP tool and render the result.